


Trust
A relationship in which one party believes another, or in which two or more parties mutually accept as true what is claimed, and accept the actions of the other as correct without prior verification (Croatian Language Portal)
What Is Zero Trust Technology?
Zero trust technology can be easily understood through everyday life situations. It represents a concept we can imagine as a world where trust is not granted lightly but is verified carefully at every step. Instead of assuming that everything inside a network is secure, zero trust changes the rules of the game by treating every access attempt as potentially risky until proven otherwise.
Drawing parallels to real life, zero trust is like having security guards at every digital door, checking IDs and credentials to protect resources before allowing entry. Another analogy can be found in spy movies, where multiple layers of security ensure that the wrong people never enter a top-secret headquarters.
From a technological perspective, instead of assuming that everything inside our network is safe, zero trust applies a cautious approach, continuously verifying who is trying to gain access.
“Never trust, always verify” is the fundamental philosophy behind zero trust networking and the key difference between zero trust and other networking models. With zero trust, there are no implicit trust relationships. Instead, all users and devices are treated as untrusted until validated. This verification process is the core of the zero trust model and is performed using various methods, including authentication, authorization, and inspection, based on criteria such as user identity, location, operating system version, driver versions, and endpoint hardware type.
The Core of Zero Trust Technology
Unlike traditional VPN tunnels that provide broad access, ZTNA grants session-based access only to specific applications and workflows once both the user and device are authenticated. Users undergo verification and authentication to ensure they are authorized to access an application before access is permitted.
SASE vs. ZTNA: Differences, Similarities and How They Work Together
In cybersecurity, we often encounter various technical concepts, and one of the most common confusions is between SASE and ZTNA. While both are important components of modern security architecture, they are not the same. SASE (Secure Access Service Edge) delivers a comprehensive, multi-layered security framework, whereas ZTNA is a more narrowly focused model designed to restrict access to resources and is one of the components within the SASE architecture. When used together, they form a more complete security solution capable of protecting applications and data regardless of user location.
Solution Design and Practice
When designing your Zero Trust Access solution—in this case, ZTNA access to internal web applications—it is important to consider the following:
- Which web applications should be accessible to users?
- Which user groups are permitted to access these applications?
- Who will authenticate the users?
- Where is the authentication server located?
- From where will users access the web applications?
- What security posture requirements must the endpoint meet to access resources?
- What is the optimal location for the EMS server?
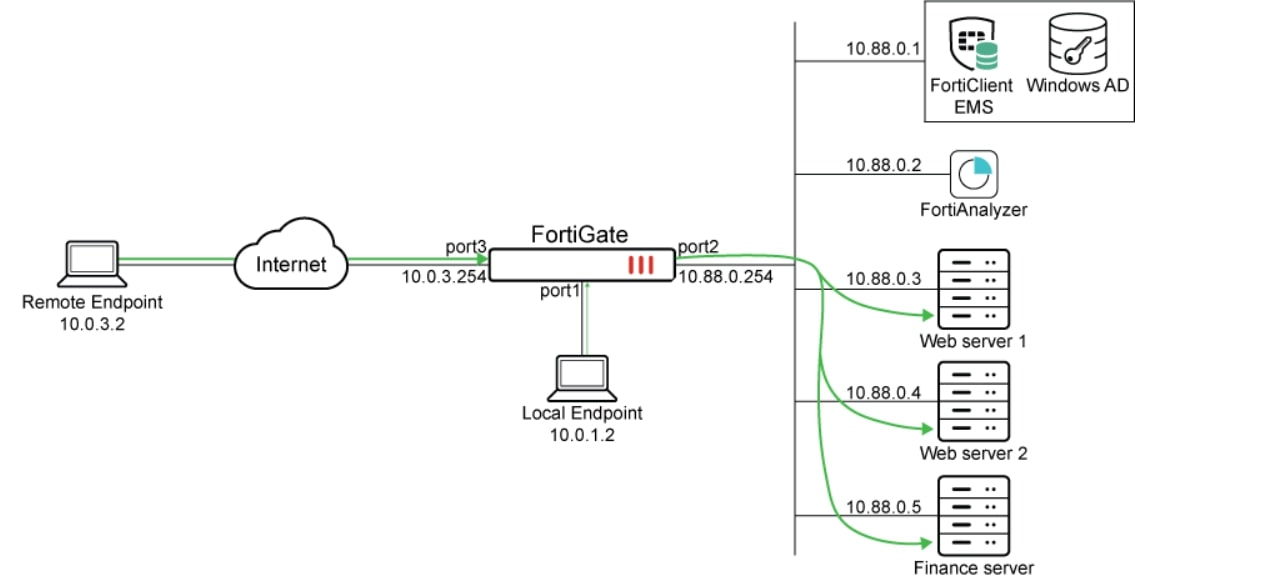
In this implementation example, we will demonstrate both remote and local access to protected web applications, as illustrated by the traffic flow arrows above.
The implementation process consists of the following steps:
- Configuration of the EMS server
- Integration of the FortiGate firewall with the EMS server
- Applying user authentication
- ZTNA configuration on the FortiGate firewall
- Configuration of ZTNA rules to control remote resource access
- Verification of application availability through the ZTNA methodology
EMS Server Configuration
To ensure communication between FortiClient endpoints and FortiClient EMS, as well as between the EMS server and FortiGate, EMS must present a certificate trusted by all connected entities.
By default, FortiClient EMS uses a certificate issued by FortiCare to each licensed EMS server to secure access to the web server and endpoint control. However, because this certificate is not issued by a public CA, it may not be trusted by connecting endpoints or by the FortiGate.
Three recommended implementation options are:
- Issue a server certificate for the EMS server using a public CA.
- Issue a server certificate for the EMS server using an ACME server.
- Issue a server certificate for the EMS server using a private CA that can be synchronized to all endpoints through Group Policy.
Adding Users
The next step in the implementation process is adding users or entities.
If you manage users through Active Directory, integrating EMS with AD using LDAP is recommended. This integration greatly simplifies future administration and system modifications.
In EMS 7.2.0 and later versions, adding an Active Directory domain has been improved to allow importing specific OUs and user groups using a tree-style selector. This can be combined with User Onboarding to define which groups are allowed to enroll their FortiClient endpoints. Importing OUs and groups also allows you to configure zero trust tagging rules that verify user membership in AD groups.
Configuring EMS ZTNA Tagging Rules
After the initial setup of the EMS service and defining users, we reach the core of the ZTNA technology: configuring our “digital security guard” introduced at the start of this blog and training it to inspect credentials and access badges.
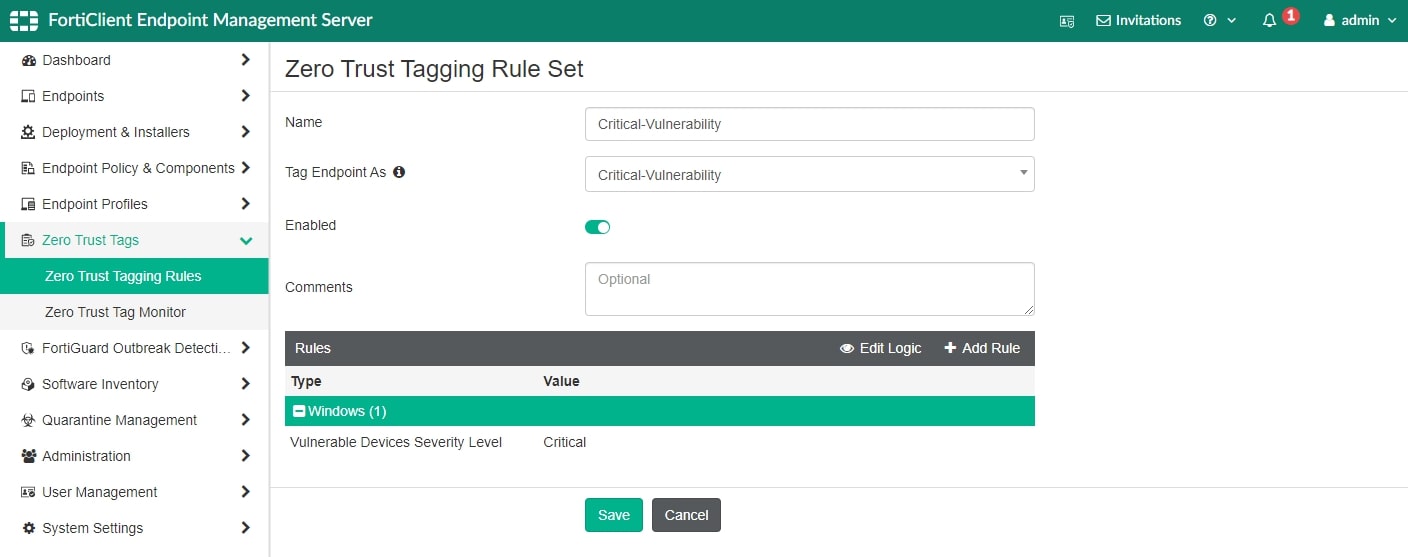
ZTNA tagging rules define the security checks that will be performed on FortiClient endpoints. They can detect the current AD group status, whether the endpoint has antivirus installed, whether it is logged into the domain, various device information such as OS version, running processes, or registry key values. They can also detect device vulnerability levels, CVE exposure, and other threat-related posture indicators. These tags are an important input to the FortiGate ZTNA application gateway, which uses them in its trust algorithm to make policy decisions and enforce security.
There are many tagging rules to choose from, and the optimal configuration will vary for every organization. The following example demonstrates how to configure a rule to detect the presence of a critical vulnerability on an endpoint.
Registration with FortiClient EMS and Verification of ZTNA Tags
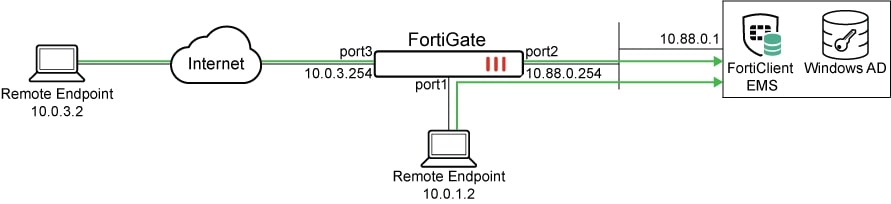
FortiClient endpoints must be able to reach the FortiClient EMS server through the FortiClient telemetry port (TCP/8013 by default) both when they are on-network and off-network. Depending on where FortiClient EMS is hosted — locally or in the cloud such as FortiClient Cloud — appropriate firewall rules need to be configured to allow this communication.
In the topology example below, the FortiClient EMS server is deployed on-premises:
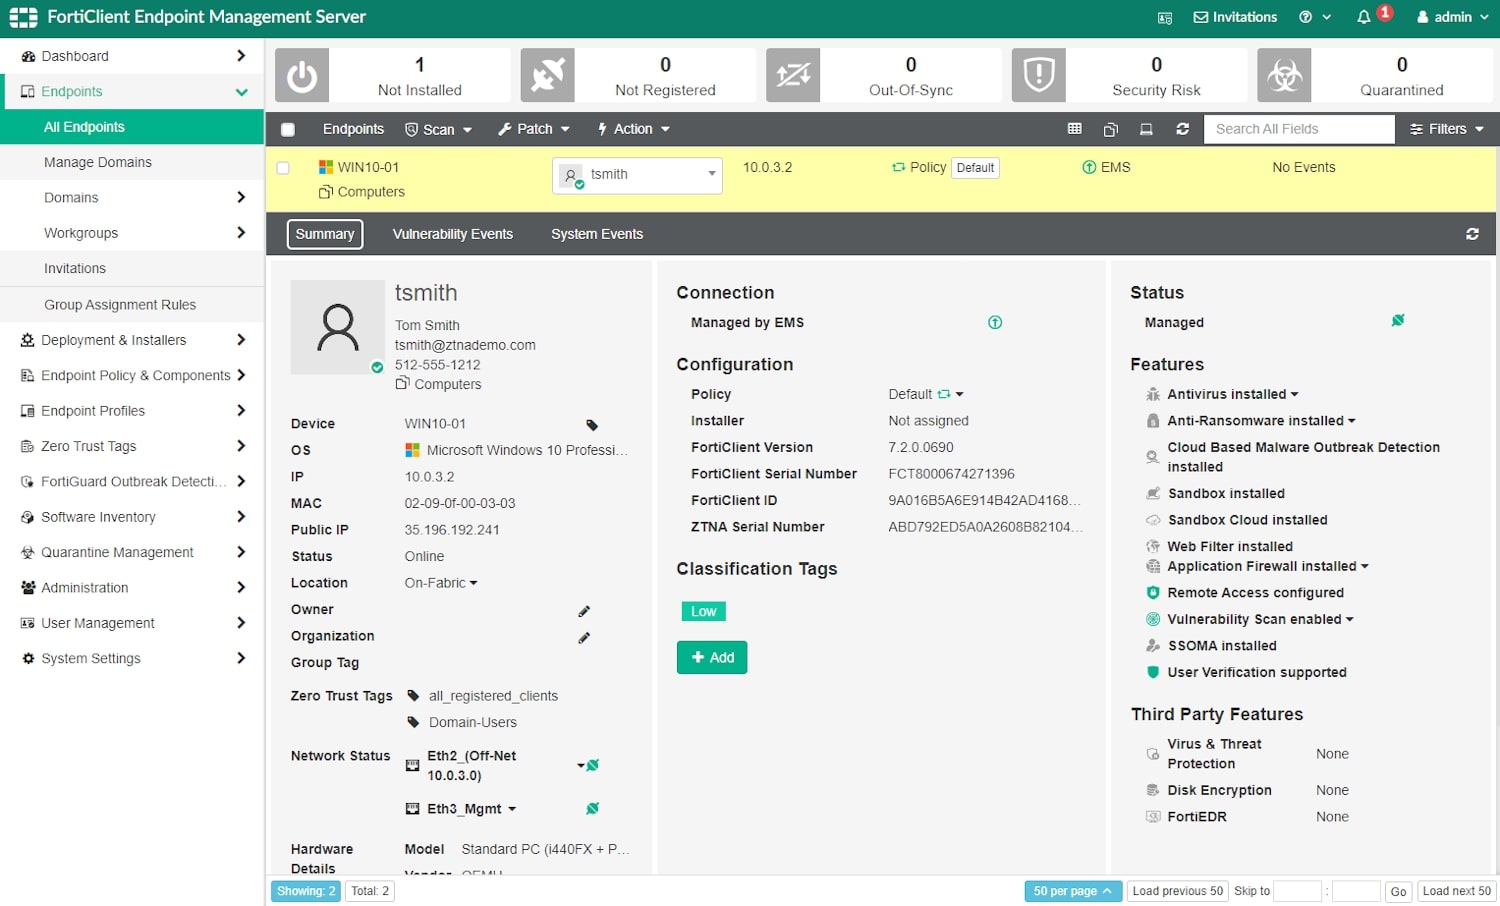
User and Endpoint Registration on EMS
This step can be used to verify whether users are able to successfully connect to the EMS server. Depending on whether user authentication is required and whether an invitation link should be sent, users will use different registration codes when enrolling their FortiClient endpoint.
The following example demonstrates a basic endpoint registration on the server ems.ztnademo.com without any form of user authentication.
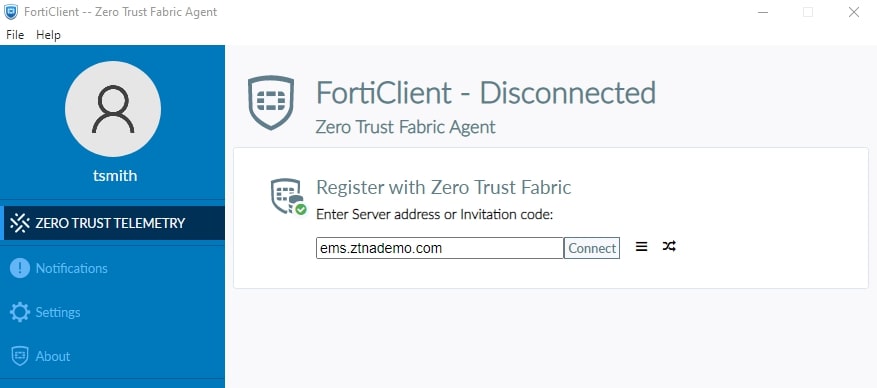

Screenshot 3: Successful login to EMS
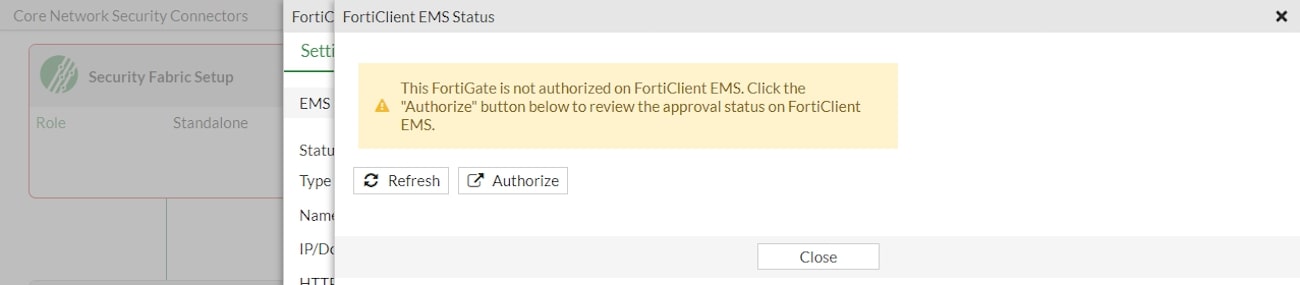
Integrating the FortiGate Firewall with the EMS Server
FortiGate must securely connect to FortiClient EMS to protect the synchronization of endpoint information and ZTNA tags. Therefore, FortiGate must have a trusted certificate chain for the EMS server certificate. The first step before connecting to EMS is uploading the CA certificate, if the EMS server certificate is not signed by a public CA.
Implementing User Authentication
The following implementation example uses an authentication scheme based on a basic method for verifying end-user identities. It also assumes the use of a predefined LDAP server (LDAP-fortiad) for remote authentication, as well as preconfigured LDAP user groups.
ZTNA supports several different authentication methods, such as SAML authentication or form-based authentication. Each provides a slightly different user experience for the endpoint user. Additionally, you can choose to use various types of remote servers besides LDAP.
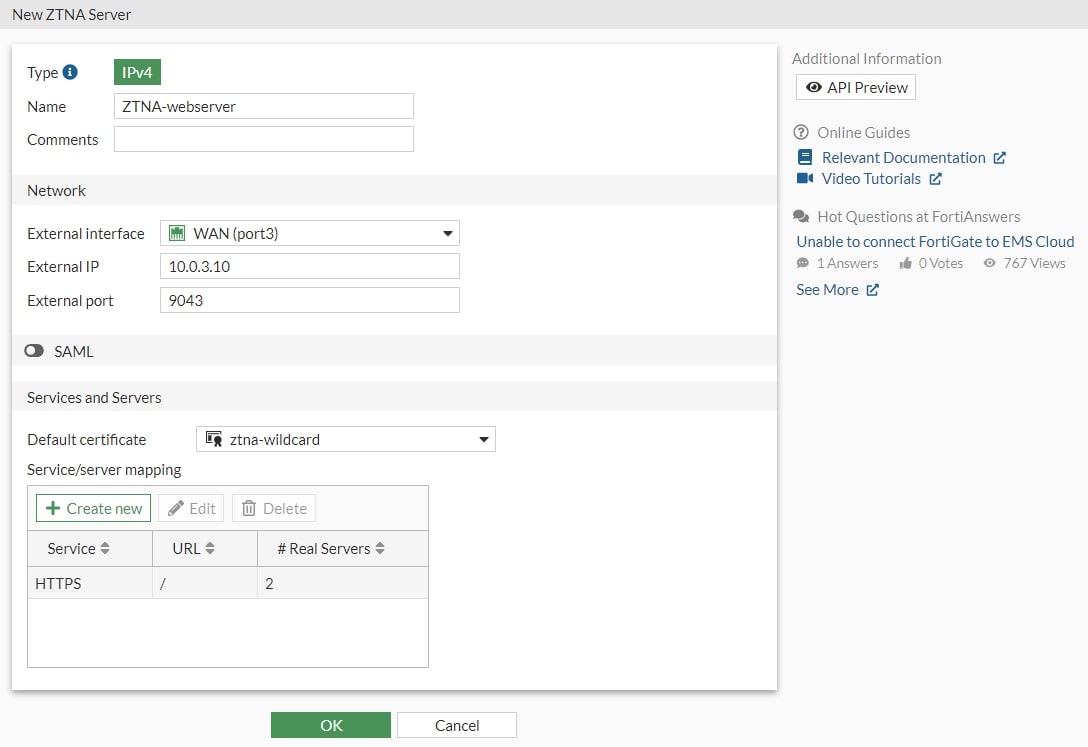
Configuring ZTNA Access on the FortiGate Firewall
To complete the implementation of ZTNA, it is necessary to create access objects on the firewall. This represents a design decision based on the following logic.
When different sets of users need access to different sets of servers, we must create two sets of simple ZTNA rules to allow the appropriate user groups to reach the server. Since simple ZTNA rules do not allow the configuration of specific destinations, we must create two ZTNA server objects that will be used in two sets of ZTNA rules.
Configuring ZTNA Policies for Controlling Remote Access to Resources
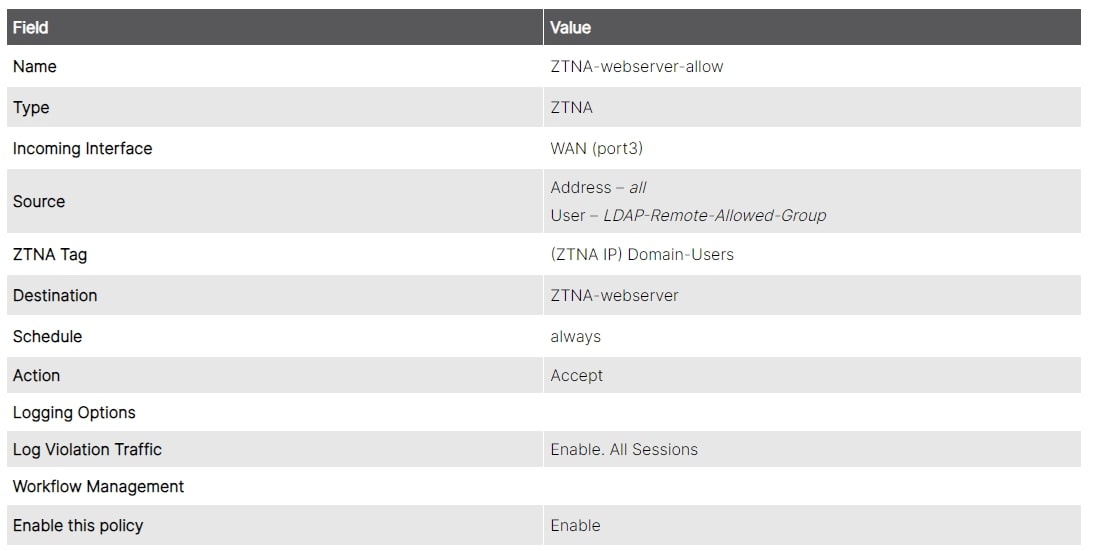
We will create one simple ZTNA policy to block access for devices marked with a critical vulnerability tag, and one ZTNA policy to allow access for the appropriate user groups. The Domain-Users tag will be used in the allow policies to ensure that connecting users are part of the domain.
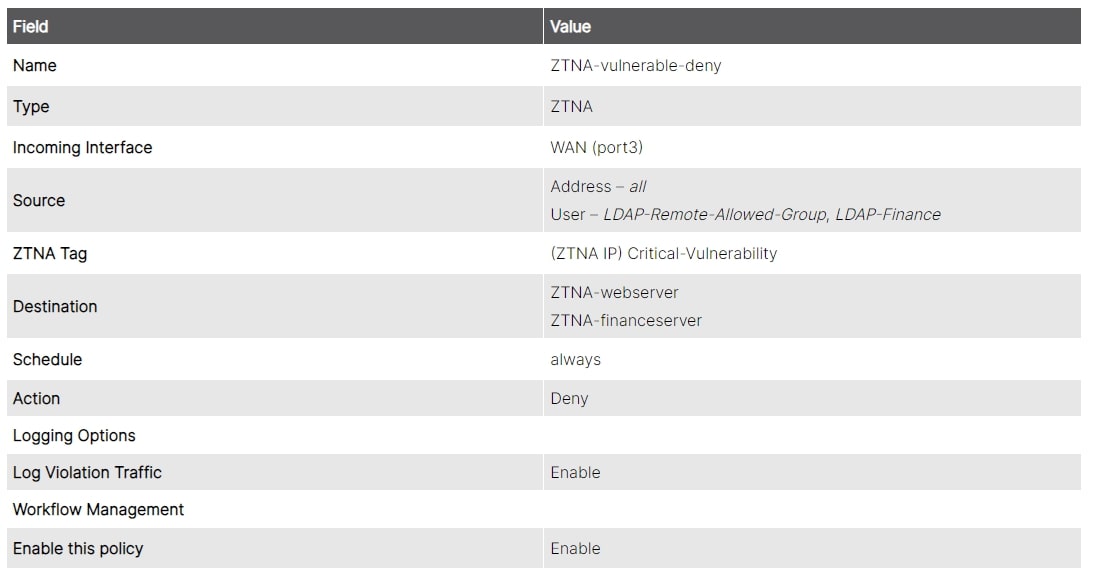
Screenshot 7: Example of access blocking rule
Verifying Application Availability Using the ZTNA Methodology
Now that the ZTNA server objects and policies have been configured, it’s time to access the web applications. Remember to update external DNS servers to map the applications’ FQDNs to the ZTNA application gateway addresses.

Zero trust doesn’t happen overnight. It is a journey.
Enhancing the security posture and improving the user experience for remote resource access can be a strong driver for implementing zero trust—but ideally, the ultimate goal is to embed zero trust thinking throughout your entire IT infrastructure. Remote access is an essential component of zero trust, but you should also consider what zero trust means for ALL access. What does it mean for your cloud environments? What does it mean for on-prem access? Ultimately, you want to reduce your attack surface and protect data across your entire organization and for every individual user, regardless of location.
Building on everything mentioned, the advantages of the Zero Trust model include enhanced cybersecurity by closing security gaps and controlling lateral movement across the network, as well as improved support for mobile and remote employees. The Zero Trust model protects data both in the cloud and in on-prem data centers, ensuring reliable defense against ransomware, malware, phishing attacks, and advanced threats. For more information about Zero Trust models and their implementation, contact us.
